Please note that the maximum size for submitting Projected Digital Images (PDIs) in WPS competitions is 1920 x 1200 pixels.
See the WPS Handbook for more details. Members can logon and see the latest handbook in the Members’ Area of our website.
If you have any questions please contact the WPS Competition Secretary.
Gordon Brown, January 2019
Download this document as a PDF
Download Tony Smith’s 2020 Resizing in Lightroom for DPI
Introduction
Images for digital projection need to be resized because projectors have a specific number of pixels and an image shape which they are designed to display which is called the “native resolution”. Projectors currently have significantly fewer pixels available than most cameras as the number of pixels cameras produce is determined by the size and shape of the sensor. If you do not resize your image to match the native resolution of the projector you are at risk of unpredictable results and therefore a poor representation of your image based on the decisions that the projector, software and laptop makes on the pixels in your image.
Most standard image-editing software (Photoshop, Photoshop Elements, Lightroom, Picasa etc) include the ability to re-size an image. Where this function is located varies though, but it is usually around an ‘image’ action or the ‘export’ function.
This document gives advice and guidance for people that are new to resizing images for projecting in club competitions and covers:
- Definitions
- Dimensions of an image
- Resizing images using Photoshop
- Resizing images using Lightroom
Definitions
- Pixel dimensions: Number of pixels in total in the width and height of an image
- Pixel density: number of pixel over a given length (usual an inch), commonly known as digits per inch (dpi)
- Image dimensions: the printable size of the image without stretching or compressing. Calculated from pixel dimension divided by pixel density. Therefore an image 1500px x 900px at 300 dpi is 5″ x 3″ (1500/300=5; 900/300=3)
- Resizing: allows us to change the print dimensions in terms of centimetres or inches together with the image resolution. It is only relevant when you are preparing an image for printing. When you are preparing an image for PDI you can completely ignore these settings
- Resampling: allows us to modify the dimensions of the image in terms of pixel width and height; the associated resolution has no effect upon the quality of the projected image. It is an operation that can be carried out without any consideration of the effect upon the associated print dimensions. ReSampling means exactly that; the number of pixels have to be resampled to insert or delete pixels to achieve the final size.
So in strict technical terms what you need to do to prepare an image for digital projection is resample it. The term resizing however has almost become ubiquitous and the de facto term for resampling and we will continue to use it (incorrectly!) in this document.
Basic Requirements
There is often a bit of confusion when referring to image dimensions. There are two aspects associated with dimensions namely; Pixel dimensions and the dimensions in terms of inches or centimetres.
Within this document the term dimensions only pertains to the pixel dimensions of the image which are the only important values when preparing an image for projecting from a laptop through a projector onto a screen, often referred to as a projected digital image (PDI). Where necessary, the alternative inches or centimetres dimensions are referred to as print dimensions.
Most of the projectors used in camera clubs, and certainly those used by the Southern Counties Photographic Federation (SCPF), project a rectangular frame 1400px (width) by 1050px (height). Therefore the proportion of the width to the height is 1.33 (1400 divided by 1050).
This document is due for review and update by the Competition Secretary.
The new size is 1920 x 1200 (often described as a ratio of 16:10 to contrast with the 16:9 ratio of some widescreen devices and many modern TVs)

Your image must fit within this frame (it does not have to be exactly 1920px by 1200px) but the height must not exceed 1200px and the width must not exceed 1920px.
The proportion of the width to the height is 1.6 (1920 divided by 1200).
If Width divided by Height is less than 1.6, specify the Height as 1200
If Width divided by Height is more than 1.6, specify the Width as 1920
Trial and error method
You can, if you wish, avoid spending time looking for your calculator or trying to remember how to do long division by adopting the following “trial and error” approach (this only works in Photoshop).
Adjust one of the dimensions to the corresponding projector height or width and check that the other value, automatically created by Photoshop, is valid.
Example
Set the width to 1920.
If the corresponding height calculated is greater than 1200, simply set the height to 1200 and the width will automatically reduce to 1920 or less.
OR
Set the height to 1200.
If the corresponding width is greater than 1920, simply set the width to 1920 and the height will automatically reduce to 1200or less.
The key is you must create an image which is within the current projector dimensions.
Resizing images using Photoshop
Portrait example

For the purposes of demonstration I am using Photoshop CS5 but the technique is the same for most versions of Photoshop.
I am going to use the portrait image shown here.
1) From the main menu selectImage-> Image Size
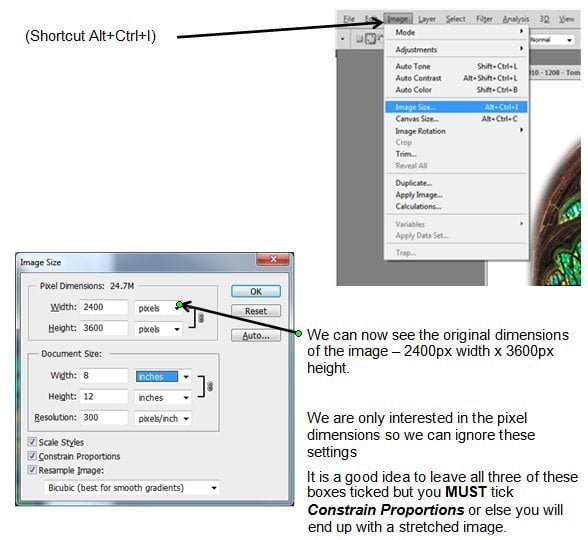
2. We can now ReSize the image.
The rule is that the image must fit in the frame shown in Dimensions above.
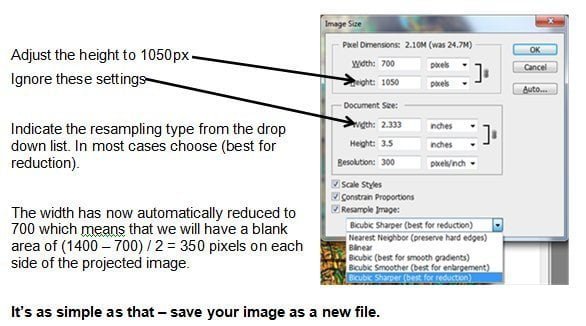
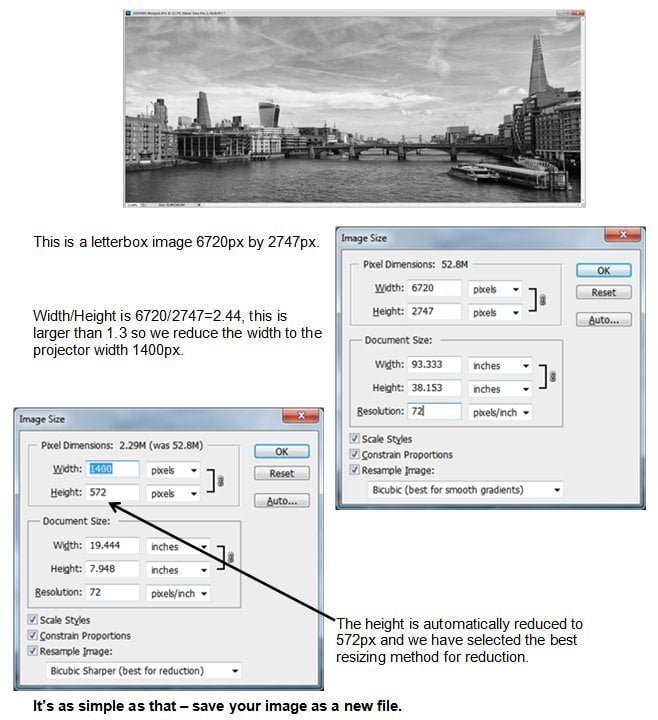
If Width divided by Height is less than 1.6, specify the Height as 1200
If Width divided by Height is more than 1.6 specify the width as 1920
In the example here 2400/3600=0.66 which is less than 1.6 so we need to reduce the height to the projector height (1200px).
Landscape example
Resizing images using Lightroom
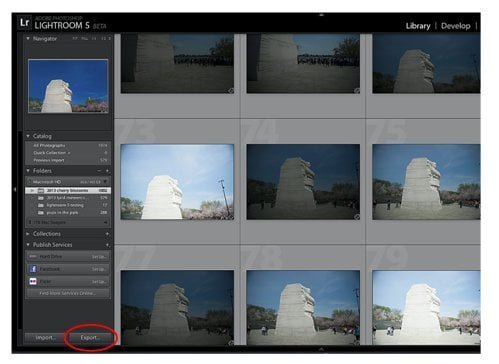
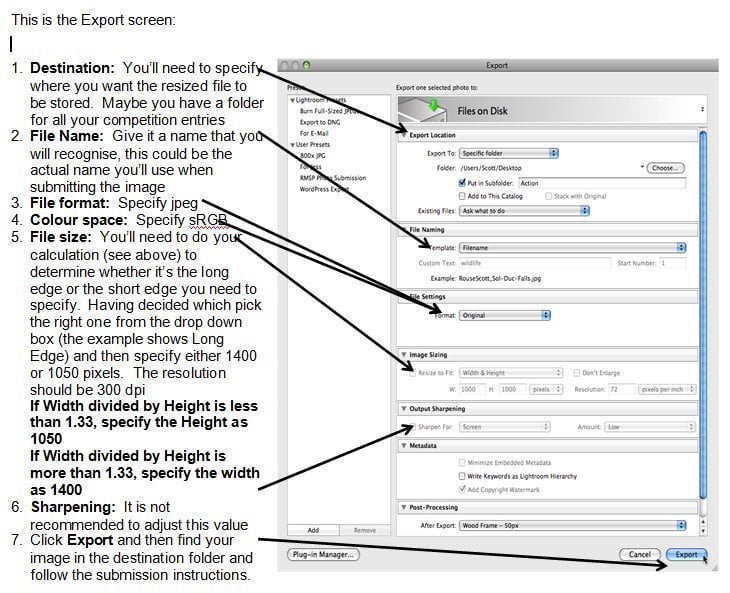
Go to the Library module (ctrl+alt+1) and click the Export button bottom left of the screen:
